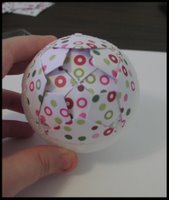
It's HERE!!!!!!! Tutorial for Pinecone Balls

UPDATED: For all of you interested in winning a kit to make these balls -- go HERE by December 1st, 2007 to enter to win!!!!!

HAPPY BLACK FRIDAY -- So you missed the greatest deal ever because you were too far back in line -- never fear, I am here to help your day get better!!!

Okay, due to the overwhelming demand for directions, I decided to do this a little earlier than I planned because SERIOUSLY you guys are all overloading my email box. I really hope you "get" them and that at the end of this tutorial you all will be happily playing with your pretty christmas ball. Bear with me, this will be my first time ever doing this . . .

INGREDIENTS:

1 sheet of 12x12 paper (or a couple if you like)
1 three inch foam ball (white foam kind)
1 package of pins (I use Applique pins - 19mm - you can get these at walmart)
1 length of ribbon (I prefer wide SU organdy)
1 thimble
1 paper cutter

STEP 1
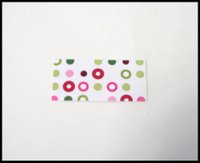
Choose your paper(Mine is by K&I Memories). Small prints or loud paper work best when choosing which paper to use. As I learned with this one, white is not always the best color to have in the background. Once you have decided, cut the paper into 1 inch x 2 inch pieces (rectangles), the entire sheet.


STEP 2
Fold your papers to make a point (see picture). Both corners meet in the middle.


STEP 3
Pin points down on center of ball. Put all points together. Folds should be on the underside where they cannot be seen.


STEP 4
Pin down the other corner points on this first row, so that all three points of each triangle are pinned in on the first row. You will ONLY do this for the first row.


STEP 5
Begin row 2 by pinning down the two ends (not the main point) You center the main point on one of the lines, so that the base of the triangle is offset to the original pinned row. Then leave the point unpinned (this forms the pinecone like look) and pin down two other sides. Repeat this row over and over until you reach the halfway point (clear as mud? Maybe the pictures will help - I hope . . . )


STEP 6
At the halfway point, pin in your ribbon. I like to stick about 4 pins on each end. If you pin the ribbon in now, leave enough at the top to form a hanger. You are going to continue to work the paper over the ribbon, which will make it secure.


STEP 7
Continue rows up until you reach the top. As you near the top, it will become increasingly harder to push the pins into the ball and through your papers -- this is where that thimble comes in handy. You will also probably run out of paper as you reach the top, or if you used 2 sheets of 12x12, will have used up 1/2 of each sheet.


STEP 8
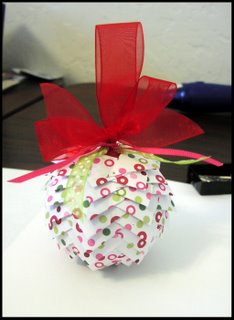
Tie bow at top and add any extra ribbon you would like. "Pretty it up" You are done. Hang ball on your tree and enjoy. If you have any questions, please post them in the comments section of this post and I will reply to them in that location. This will keep me from getting a bazillion emails asking the same questions. Thanks *smiles*

Comments

Jody Morrow said…
Awesome tutorial Manda! I couldn't find the directions I sent you, so I am g;ad you held on to them. LOL
Amanda said…
I so didn't Jody . . . I just made this up as I went along . . . DOH!
Amanda said…
I am sure I have them somewhere, in some folder . . . my office still looks like a bomb went off . . . YIKES!
Anonymous said…
Amanda, you're a DOLL! I've been just dying to try this after seeing your gorgeous creations. I just got back with the styrofoam balls! Wooohooo!
Anonymous said…
Thank you, thank you!! I was checking today to see if you had, had time to post the directions. I love these, they're great and I can't wait to try them!!
Erica said…
This is awesome Amanda, thanks so much for putting this together for us!!
Anonymous said…
Thank you! These are awesome!
Anonymous said…
Thank you! These are awesome! I'm hoping to make some for Christmas.
Danita said…
Yay! Thanks for the tutorial!! Can't wait to try it out! :)
Eileen said…
These are great, Amanda! How far apart do you space the rows?
Anonymous said…
Thanks for sharing the directions, Amanda! I haven't done these for years, and never with paper. So it would have taken me a while to remember.

These are so cute! Your RS is lucky to have you sharing so many projects with them!
Shelly said…
This is such a cute idea. My family has a tradition of getting a new ornament for each family member each year. I think this is going to be my inspiration this year. Thanks so much for posting it.
Anonymous said…
Hi Amanda!!! Thanks so much for the directions. When you use two diffrent colors of paper are they rotated every other row or every second row or.....?? Thanks so much!!!
Anonymous said…
These are so pretty. My Dad used to make these out of cloth when my Mom and him were doing craft fairs with me.
Amanda said…
Eileen, I think I usually make them about a half inch apart to 3/4 inch apart. I just use my best judgment. I create a small "W" or "M" shape -- depending on how you are looking at it, when I am pinning them in.
Amanda said…
Vicki, for some reason I cannot remember, I will have to make another multicolored one and try it out again. I think I might have done two rows all one color and then switched, so that it is all stripes . . . but not sure . . . I will have to go check . . .

BRB
Amanda said…
Okay, yes, that is what I did. I did 2 full rows one color and then switched, so that is 8 triangles.

I am so glad that so many of you are excited about these and are going to create them! It is wonderful!

Just a reminder too, that when you choose paper -- thin is better than thick because when you are pushing those pins in, it is going to get really hard at the end *smiles*
Aimee said…
I just made one and will post it to my blog when I figure out where the heck my camera walked off to. TFS....
Sarebear said…
I have made three!!! I have the stuff I bought yesterday for 15 more . . .

Paper that looks like fabric, or distressed fabric (I used a red/brown floral print one by Daisy D's I think, for my first one) is drop dead gorgeous!!! I have some other fabric prints in the stash I bought, although my 2nd and third used a mod circles made out of dots print, and a light purple rounded/retro squares attached to squares dark purple print!

I can't post em to my blog until some people receive theirs in a week and a half or so, though.
Sarebear said…
er, a vintagey fabric print. Altho more modern fabric prints might be nice too!
Anonymous said…
This is truly amazing. I can't wait to try it.
Thankyou so much for taking the time to post the directions.
Anonymous said…
these directions are awesome..thanks!!! Want to try one of these very soon!!
Anonymous said…
Thanks Amanda! I have made three so far....they are awesome and so impressive. You are right about the paper, thin is better, One of the ones I made I used card weight paper and it was very hard to get the pins in, but it still turned out great. Even my mistakes don't show much!!! LOL!!! :):)
Anonymous said…
What a great idea. And a brilliant tutorial. Thanks so much.
Anonymous said…
Thanks, Amanda! These are so pretty & easy to make - will make as gifts! Donna
Anonymous said…
This is the MOST amazing hand-made ornament I have ever seen! When I tried it myself I found that I had to trim some of the pieces when I got close to the top so that the corners of the triangles didnt show.It seemed like the pieces were to big...Did this happen for you?Any suggestions? Mine still looks good but the finished product isnt as perfect looking as yours!
*TIP*-I used my paper piercing tool from SU! to pre punch the holes towards the end,it really helped with the sore fingers ( I dont own a thimble)
Melanie
Amanda said…
That paper piercing tool idea is cool! YAY! Very smart. Sometimes I cut the ones at the top too. On this particular decoration, I did not and it looks okay. I think it depends on the paper you are using. As you do more and more of them you will get more consistent in your placement and have them turn out more evenly! Thanks for playing!!!
Taylor said…
WOW Amanda!! This tutorial is awesome and I really hope I get a chance to try one of these fab ornaments! Thanks for sharing!
Anonymous said…
Wow! Something else I have to crunch into the little bit of time I have to craft! Got your link from Debbie's blog. Her ornament with the little rosebuds on top is gorgeous!
Jessica Hewitt said…
ive made some before with ribbon, but never thought about paper...great idea amanda!!
Anonymous said…
Absolutely awesome! I made two and a half (I RAN OUT OF PINS!) in an hour tonight. They are so easy once you get going. Going back tomorrow to get more pins so I can get five made for my girls that are coming for the Christmas exchange on Saturday. TFS!
Trudee said…
I was looking for some cool ornaments to make and these fit the bill! Thanks so much for the tutorial! :)
Thanks for this! Quick question, do you think it would work to cut them into triangles instead of rectangles that get folded? Or wouldn't this work because the underside would be plain? Obviously haven't tried this yet but I was just wondering... Thanks!
Anonymous said…
These are great. I am going to have to make some to give as gifts.
Anonymous said…
This is so sweet!! I have always wanted to do a homemade tree. Where everything is homemade. This is perfect. I do have one question. Is there only four triangles per row?

Beth F
boynecitygrl@yahoo.com
Anonymous said…
This is wonderful! Our school has a big auction every year as the main fundraiser. This year, I am in charge of my daughter's class project which is a Christmas tree with all homemade ornaments. With some patience, I think this is something these kids can do (small class, thankfully!). I have added styrofoam balls to my shopping list! Thanx so much for sharing this!
Keri Brown said…
i just found these and they are fantastic.. I am buying the materials today to make some of these.. I plan to make a couple Halloween ones to hang in my house... I just love them.. Thank you so much for sharing... Your blog is amazing Amanda...
Lisa Renéa said…
What a gorgeous ornament! Thanks for the tutorial!
Velta said…
Wow...Thanks for the tutorial. I saw this at Donna's site and am so glad she posted your tutorial. Thanks!
Catalina said…
Beauuuuuuuuuuuuuutiful!!! Thank you!
tomiannie said…
Thanks for the great tutorial -- I found a link from another messageboard, and I can't wait to try these! By the way, are you LDS? I saw another comment referring to RS, which to me means Relief Society! I'm always excited to meet another LDS crafter/blogger. Thanks again for the great instructions!
Wow! Fantastic tutorial. I am going to have to see if I can find some styrofoam balls and pins, so I can try these.
Debbie G said…
Oh I can't wait to try this. I hope I am the lucky one! Thank you so much Amanda for offering this.
Dri Santos said…
Congratulations!

Beautiful work!
I indicate in my blog!

http://drisantos.blogspot.com

Dri Santos
Hinke said…
Wow, thank you for sharing this with us. I hope you don't mind I am going to translate this in Dutch.

Thanks
Hinke
Hinke said…
I finally finished my cone. You can see it on this link

http://www.hinkeltje.com/layouts/picshow.php?choosen_id=314

Bye
And merry christmas for everyone.

Hinke
Ruth said…
wow what a great tutorial--thanks for sharing
Beth said…
Hey! I can totally do this! Adding the supplies to my shopping list! What fun!
Angelina said…
Paper that looks like fabric, or distressed fabric (I used a red/brown floral print one by Daisy D's I think, for my first one) is drop dead gorgeous!!! I have some other fabric prints in the stash I bought, although my 2nd and third used a mod circles made out of dots print, and a light purple rounded/retro squares attached to squares dark purple print!

Popular posts from this blog

HANNA PREVIEW: For the Soul

This set is totally cool! I have not seen anything like it! I think it is perfect for a sympathy card, a thinking of you, a little hand out at church, maybe even for cards at Easter (thinking ahead here) etc. It is so CUTE! Hanna looks so angelic and well, to be completely honest, reminds me of my little sister (not sure why). I used the sketch at Card Positioning Systems (#83) for the layout. I was going for a "touched by an angel" look on the main image (and I think I kind of created that.) I used vellum to overlay the image to give it that glossy fuzz (soft focus). Stamps : For the Soul (Hanna Stamps), "God Bless" sentiment by American Art Stamp Paper: Lily Kate - Basic Grey, Neenah Solar White, SU vellum card stock, SU Whisper White Ink : Onyx Black Versafine Accessories : Sheer 5/8th Inch organdy ribbon, Nestabilities (Circle and scalloped circle), sewing machine, white thread, circle of plastic canvas, copic markers, white brads, paper piercing ...

Chase Away the Friday the 13th Blues . . .

and hop along in the Hanna Stamps "Good Luck Blog Hop!" Who believes in paraskavedekatriaphobia (fear of Friday the 13th)??? NOT ME!!! Friday the 13th is FAR from scary around here!!! I am so excited about this! I mean, how fun is it to blurf and then have an chance to win SURPRISE GOODIE BAGS for doing so??? It's so easy -- all you have do to be entered is leave a comment on this post, and then blurf on over to Cindy's blog and rinse and repeat. You can enter once on each of the design team members blogs and there will be a winner chosen at random from the comments left on each blog on Monday . . . HOW COOL EH?! If you are reaching this post out of sequence, the blog hop starts HERE at Kristi's blog . (Don't want you to miss all the possible opportunities to win.) This card is for the Friday challenge (HSFC60) in the Hanna Stamps forum over on splitcoast. This week Jeanne challenged us to use diamonds in our design, cause 'Hanna sparkles like a...

I don't have one but . . .

I came across this article today and thought it might be of interest to some of you, so I thought I would post it here: Provo Craft ended up on loyal customers' 'naughty' list Tell me what you think about this? Do you think Provo Craft was in the wrong? Do you think they should have done this? I wanna hear all the goods and bads.