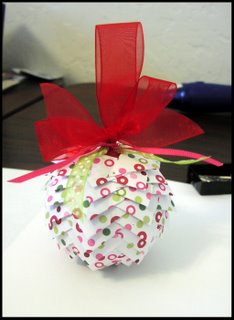
UPDATED: For all of you interested in winning a kit to make these balls -- go HERE by December 1st, 2007 to enter to win!!!!!
HAPPY BLACK FRIDAY -- So you missed the greatest deal ever because you were too far back in line -- never fear, I am here to help your day get better!!!
Okay, due to the overwhelming demand for directions, I decided to do this a little earlier than I planned because SERIOUSLY you guys are all overloading my email box. I really hope you "get" them and that at the end of this tutorial you all will be happily playing with your pretty christmas ball. Bear with me, this will be my first time ever doing this . . .
INGREDIENTS:
1 sheet of 12x12 paper (or a couple if you like)
1 three inch foam ball (white foam kind)
1 package of pins (I use Applique pins - 19mm - you can get these at walmart)
1 length of ribbon (I prefer wide SU organdy)
1 thimble
1 paper cutter
STEP 1
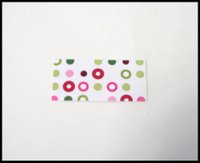
Choose your paper(Mine is by K&I Memories). Small prints or loud paper work best when choosing which paper to use. As I learned with this one, white is not always the best color to have in the background. Once you have decided, cut the paper into 1 inch x 2 inch pieces (rectangles), the entire sheet.
STEP 2
Fold your papers to make a point (see picture). Both corners meet in the middle.
STEP 3
Pin points down on center of ball. Put all points together. Folds should be on the underside where they cannot be seen.
STEP 4
Pin down the other corner points on this first row, so that all three points of each triangle are pinned in on the first row. You will ONLY do this for the first row.

STEP 5
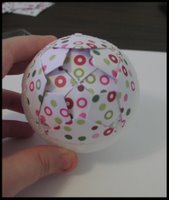
Begin row 2 by pinning down the two ends (not the main point) You center the main point on one of the lines, so that the base of the triangle is offset to the original pinned row. Then leave the point unpinned (this forms the pinecone like look) and pin down two other sides. Repeat this row over and over until you reach the halfway point (clear as mud? Maybe the pictures will help - I hope . . . )
STEP 6
At the halfway point, pin in your ribbon. I like to stick about 4 pins on each end. If you pin the ribbon in now, leave enough at the top to form a hanger. You are going to continue to work the paper over the ribbon, which will make it secure.
STEP 7
Continue rows up until you reach the top. As you near the top, it will become increasingly harder to push the pins into the ball and through your papers -- this is where that thimble comes in handy. You will also probably run out of paper as you reach the top, or if you used 2 sheets of 12x12, will have used up 1/2 of each sheet.
STEP 8
Tie bow at top and add any extra ribbon you would like. "Pretty it up" You are done. Hang ball on your tree and enjoy. If you have any questions, please post them in the comments section of this post and I will reply to them in that location. This will keep me from getting a bazillion emails asking the same questions. Thanks *smiles*


Comments
These are so cute! Your RS is lucky to have you sharing so many projects with them!
BRB
I am so glad that so many of you are excited about these and are going to create them! It is wonderful!
Just a reminder too, that when you choose paper -- thin is better than thick because when you are pushing those pins in, it is going to get really hard at the end *smiles*
Paper that looks like fabric, or distressed fabric (I used a red/brown floral print one by Daisy D's I think, for my first one) is drop dead gorgeous!!! I have some other fabric prints in the stash I bought, although my 2nd and third used a mod circles made out of dots print, and a light purple rounded/retro squares attached to squares dark purple print!
I can't post em to my blog until some people receive theirs in a week and a half or so, though.
Thankyou so much for taking the time to post the directions.
*TIP*-I used my paper piercing tool from SU! to pre punch the holes towards the end,it really helped with the sore fingers ( I dont own a thimble)
Melanie
Beth F
boynecitygrl@yahoo.com
Beautiful work!
I indicate in my blog!
http://drisantos.blogspot.com
Dri Santos
Thanks
Hinke
http://www.hinkeltje.com/layouts/picshow.php?choosen_id=314
Bye
And merry christmas for everyone.
Hinke