
Playing with Alcohol Inks

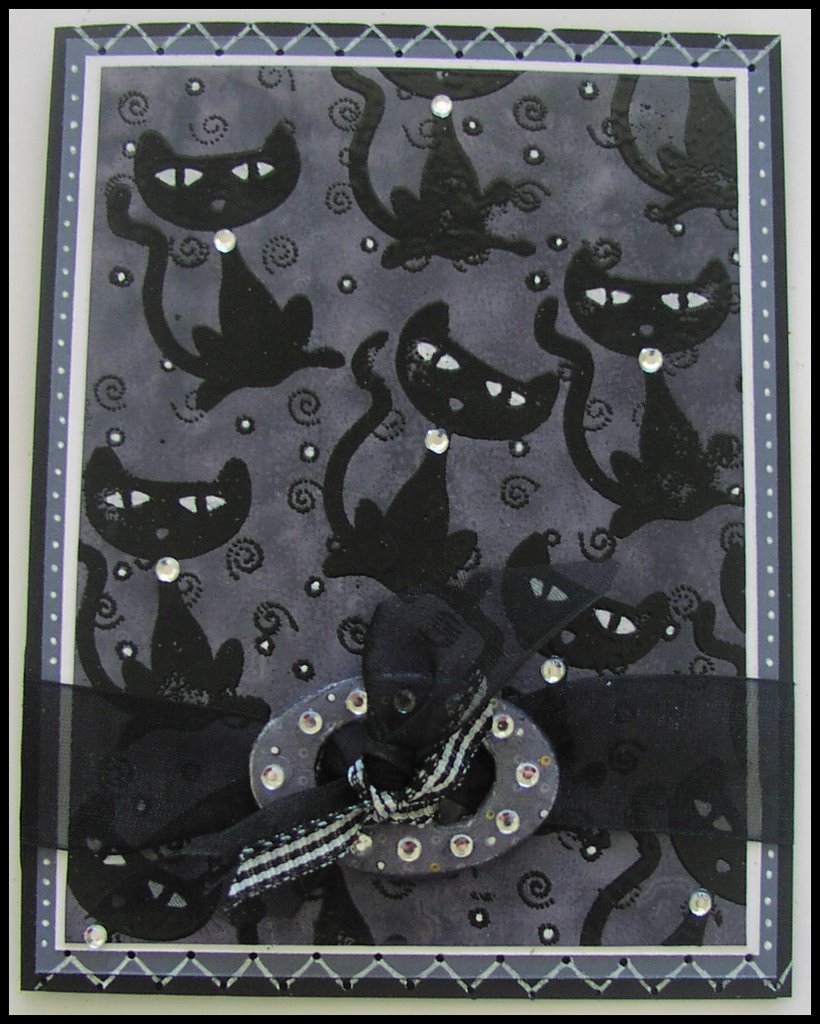
As I said before, Karen and I spent some time playing with alcohol inks. I made lots of papers but did not make any cards with them, until last night. I decided to play. It turned out to be fairly productive -- two cards in one evening is not bad for me.

The first card was actually not the adirondack alcohol inks, but did use the applicator and felts. Karen made this background. It is done with rubbing alcohol on the felt and then adding drops of vintage violet reinker. It turned out just as bold as the alcohol inks this way. I decided to play with chipboard and my Halloween paper since it matched perfectly, and I covered a buckle with it and added gem stones. Then I stamped the cats in versamark and embossed them in black. I decided the card needed something more, so I stamped the swirl from Fresh Fillers everywhere in versamark and embossed it. I then went a little crazy with the white gel pen. I think it looks good though. I colored the cats eyes in first for a shocking effect, then added dots everywhere. My final touches were to add the ribbon and the buckle and gem collars on each of the embossed kitty cats -- I wanted them to be posh. Inside is stamped "Happy Boo to You" from SU Booglie Eyes. (Sorry about the slight glare on the corner of this photo. I will try to take another one before I send this out).


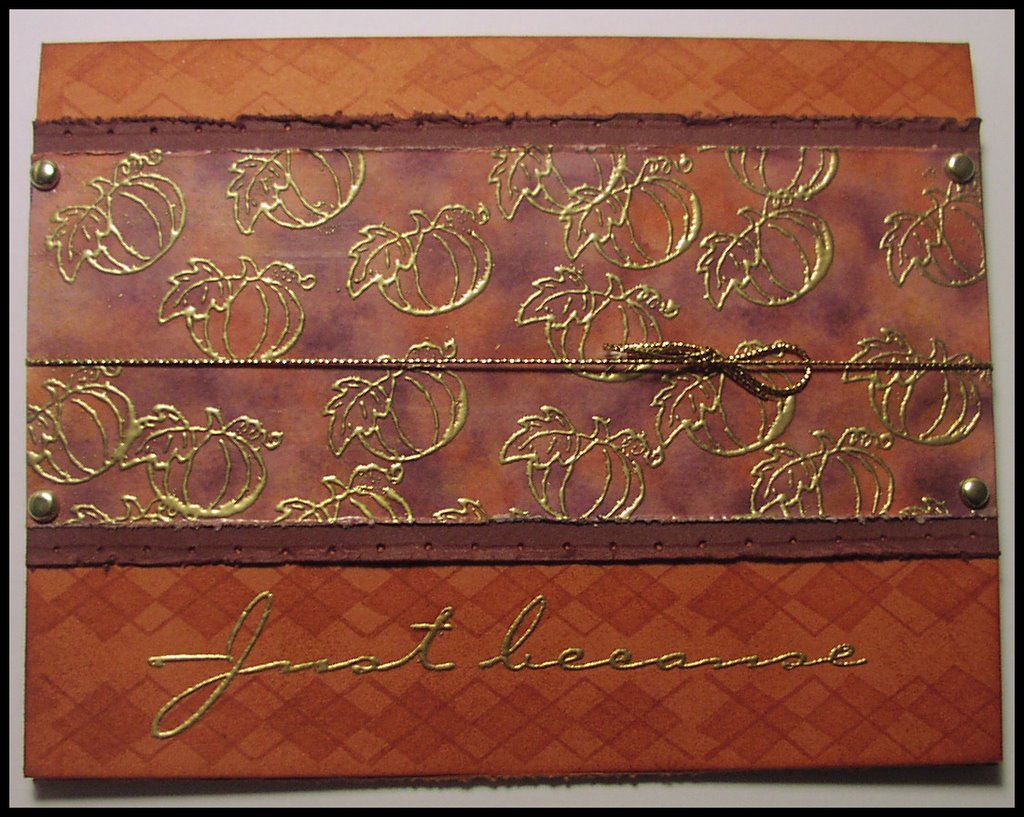
The second card I made, I used the adirondak inks (currant and terra cotta) and the blending solution. The colors are vibrant and great. I used the same idea of embossing on top of the alcohol inks. This time I did the embossing in gold. I used my Heidi Swapp distresser (thank you to Karen who pointed this out when were were at my LSS -- it was only $1) and distressed the edges of the cardstock. Then, after layering the pumpkin panel on the bravo burgandy cardstock, I pierced in a row and then faux stitched using a rose red SU marker. I embossed "Just Because" from SU "Simple Sayings II" and I stamped an argyle background using versamark and SU "All Around Argyle." I tied gold cord around the pumpkin panel and added gold brads in the corners for a little added embellishment. I am totally just loving the alcohol inks and the great vibrant looks you can get.

Comments

Alli said…
OMG! Amanda these are gorgeous, but the second one is just amazing. You should submit this one to a magazine, I know it would get published. The gold embossing just works so well with the colors of alcohol ink!
Anonymous said…
I just love your cards, especially the pumpkin one (some of my favorite colors!). These are pretty great!
Karen said…
great cards!! love them both - the black/white contrast is great and the Fall card is perfect w/the gold embossing!! hmm...need to open my alcohol inks and give this a try!!

Popular posts from this blog

My Decade Later Comeback and Playing Catch Up

Hello friends, It's been awhile and I kind of dropped off the face of the planet since moving to Oregon. I got busy with growing four babies into teens, and attempting to hold together a marriage with a partner who was working out of town for the most part. It was a lot! Truth be told, I have been spending most of my time over on Instagram which allows for more quick picture and caption posts (@the.amanda.sewell), but I really, genuinely miss having a journal of our adventures, so I'm back.  Some changes, my ex-partner moved out in October of 2023 (after 23 years of marriage, who would have thought?) and I am on a new, single mom adventure with the fabulous four. Luckily, they are adjusting to the changes well as we navigate this challenging time as a family team. Things are still in flux and hopefully at the end of all of this, the dust will settle and we will end up landing on our feet. Because of this change, I needed to go back to work and after not working for the past lo...

ALMOST TO 50K

EDITED TO ADD: I go by my first name, not my middle. My first name is Amanda. *smiles* Also, I am going to keep this post bumped up to the top so people can find it, but I will be posting more, so please take a moment to scroll down to find the latest stuff -- this will stay up until 50K is reached. *************************** I am so amazed that so many people have been interested in little old stamping me. Okay, well, not me actually, probably mostly my work, but either way, I'm SUPER FLATTERED! I appreciate all the comments you leave me. They really do validate me and make me feel like I should keep on going with this blog. You all ROCK! So, I have decided to do a small giveaway to show my appreciation to you. I will have two separate contests. Both of these contests will win you blog candy (yummy embellishments, and other such fun stuff). The first one is to guess my middle name. You can post your guess as a comment to this post and then I will do a drawing of every...

It's HERE!!!!!!! Tutorial for Pinecone Balls

UPDATED: For all of you interested in winning a kit to make these balls -- go HERE by December 1st, 2007 to enter to win!!!!! HAPPY BLACK FRIDAY -- So you missed the greatest deal ever because you were too far back in line -- never fear, I am here to help your day get better!!! Okay, due to the overwhelming demand for directions, I decided to do this a little earlier than I planned because SERIOUSLY you guys are all overloading my email box. I really hope you "get" them and that at the end of this tutorial you all will be happily playing with your pretty christmas ball. Bear with me, this will be my first time ever doing this . . . INGREDIENTS: 1 sheet of 12x12 paper (or a couple if you like) 1 three inch foam ball (white foam kind) 1 package of pins (I use Applique pins - 19mm - you can get these at walmart) 1 length of ribbon (I prefer wide SU organdy) 1 thimble 1 paper cutter STEP 1 Choose your paper(Mine is by K&I Memories). Small prints or loud paper work best ...