
SC 94 - Really cool way to make a card.

So I had a great mail day yesterday. I got this most adorable card from Teresa and a little mini card, for Hallowe'en, in the same envelope. The card is what I want to focus on here though. She used the layout from SC94 and it just looked so darling, I was inkspired to make one of my own for my DDSS for round 6. I have been a slacker DDSS, so I am trying to do better. I just find it so hard to use only SU supplies for it. Anyway, I digress . . .

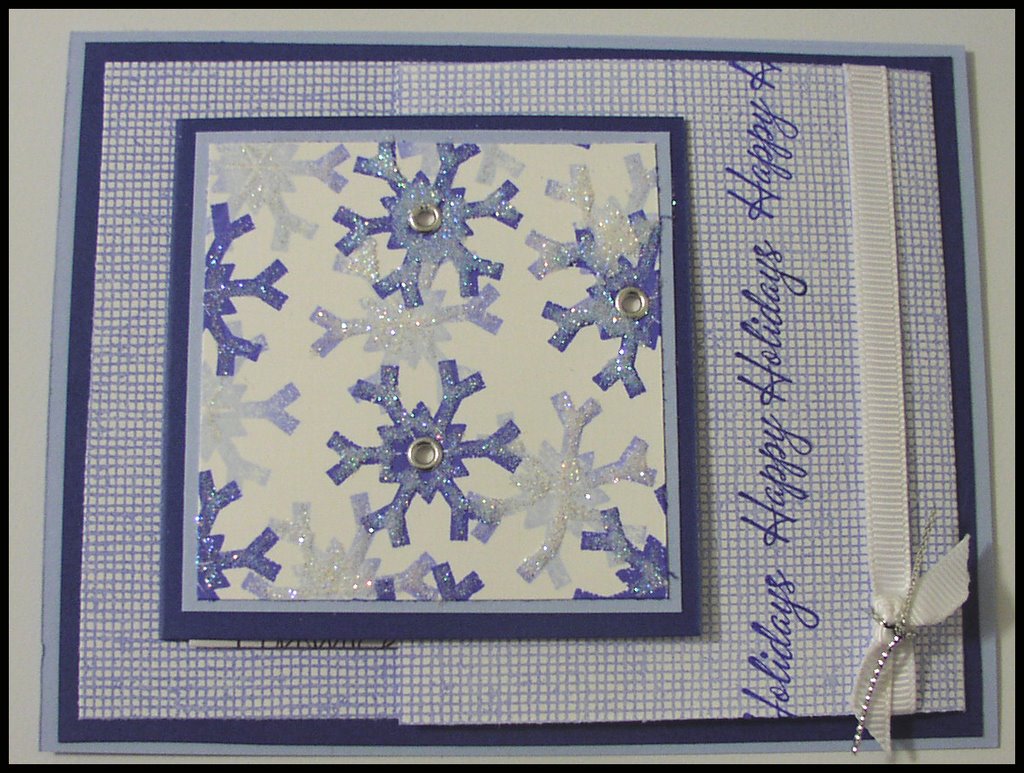
This card uses the "Blue Frost" spectrum pad from SU (which in case you were wondering, does not look all that nice when you accidentally drop it face down on your laptop keyboard.) I also used the SU hostess set "Warmest Regards" which I am currently in love with, and "All Through the Year" which is seriously so versatile. Oh, and cannot forget the "Canvas" background stamp. You will definitely have to take a look at the Sketch Challenge page to see how it opens and stuff. I used two way glue pen and dazzling diamonds on the snowflakes and eyelets in the center because ever since I bought the silent setter from ProvoCraft, I have no reason not too -- it is glorious. I really am happy with how this one turned out and I really hope that my DDSS likes it.

Comments

Jen said…
Totally cute Manda! Love the different colored snowflakes and the sparkles!!
Alli said…
Cool card Amanda, the snowflakes look brilliant!
Karen said…
very pretty card. I love the blues.
Anonymous said…
Lovely! So glad you liked my card!!!
Lisa said…
This is so pretty Amanda. You are rockin'.
Karen said…
she'll love it Amanda! love this sketch too and the glitz of your card!!
Aimee said…
I like it... very nice...
Stampin_Melissa said…
Manda, this is just too cool looking! Great job!

Popular posts from this blog

My Decade Later Comeback and Playing Catch Up

Hello friends, It's been awhile and I kind of dropped off the face of the planet since moving to Oregon. I got busy with growing four babies into teens, and attempting to hold together a marriage with a partner who was working out of town for the most part. It was a lot! Truth be told, I have been spending most of my time over on Instagram which allows for more quick picture and caption posts (@the.amanda.sewell), but I really, genuinely miss having a journal of our adventures, so I'm back.  Some changes, my ex-partner moved out in October of 2023 (after 23 years of marriage, who would have thought?) and I am on a new, single mom adventure with the fabulous four. Luckily, they are adjusting to the changes well as we navigate this challenging time as a family team. Things are still in flux and hopefully at the end of all of this, the dust will settle and we will end up landing on our feet. Because of this change, I needed to go back to work and after not working for the past lo...

ALMOST TO 50K

EDITED TO ADD: I go by my first name, not my middle. My first name is Amanda. *smiles* Also, I am going to keep this post bumped up to the top so people can find it, but I will be posting more, so please take a moment to scroll down to find the latest stuff -- this will stay up until 50K is reached. *************************** I am so amazed that so many people have been interested in little old stamping me. Okay, well, not me actually, probably mostly my work, but either way, I'm SUPER FLATTERED! I appreciate all the comments you leave me. They really do validate me and make me feel like I should keep on going with this blog. You all ROCK! So, I have decided to do a small giveaway to show my appreciation to you. I will have two separate contests. Both of these contests will win you blog candy (yummy embellishments, and other such fun stuff). The first one is to guess my middle name. You can post your guess as a comment to this post and then I will do a drawing of every...

It's HERE!!!!!!! Tutorial for Pinecone Balls

UPDATED: For all of you interested in winning a kit to make these balls -- go HERE by December 1st, 2007 to enter to win!!!!! HAPPY BLACK FRIDAY -- So you missed the greatest deal ever because you were too far back in line -- never fear, I am here to help your day get better!!! Okay, due to the overwhelming demand for directions, I decided to do this a little earlier than I planned because SERIOUSLY you guys are all overloading my email box. I really hope you "get" them and that at the end of this tutorial you all will be happily playing with your pretty christmas ball. Bear with me, this will be my first time ever doing this . . . INGREDIENTS: 1 sheet of 12x12 paper (or a couple if you like) 1 three inch foam ball (white foam kind) 1 package of pins (I use Applique pins - 19mm - you can get these at walmart) 1 length of ribbon (I prefer wide SU organdy) 1 thimble 1 paper cutter STEP 1 Choose your paper(Mine is by K&I Memories). Small prints or loud paper work best ...