
Boss' Day

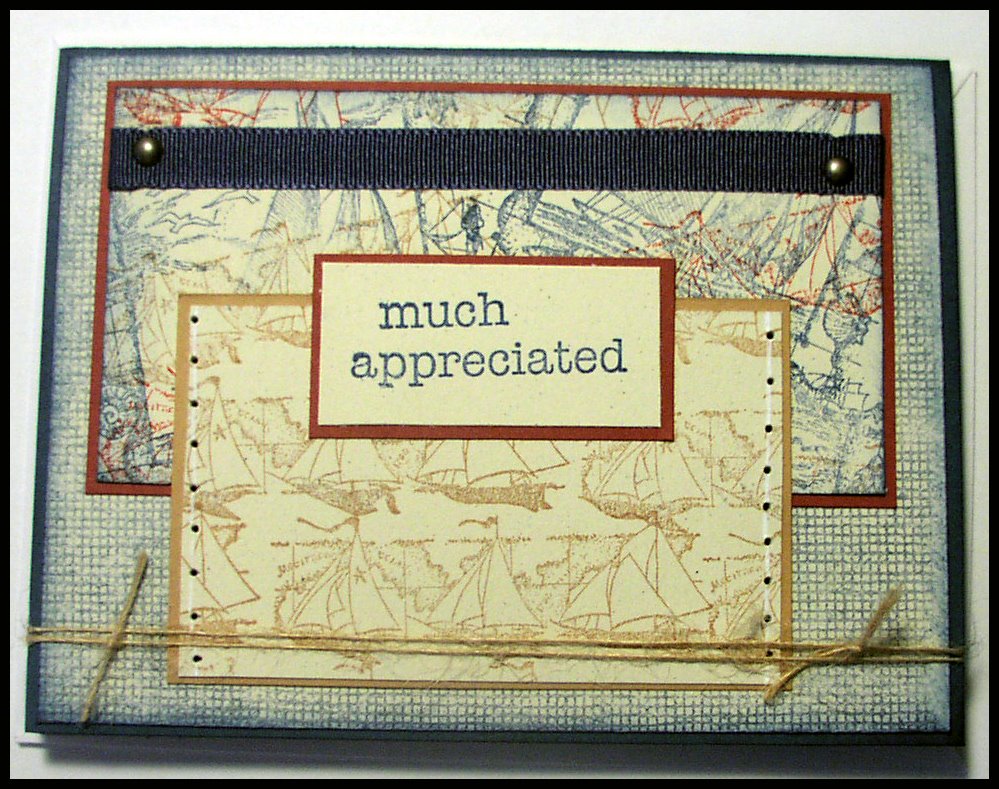
I don't have a boss, I am the boss, *smiles* well, at least of my household during the day! But, M does have a boss, and so I made it a quest to create a masculine card for him to give his boss. It was not an easy task for me, but here is what I came up with. I really hope his boss likes it.

I used SU's "Set Sail" because I don't have any masculine sets that are current. Good info for me though for Fathers Day -- clearly I will need one. The colors are creamy caramel, ruby red, and not quite navy. The neutral paper is confetti cream. The ribbon is American Crafts Elements ribbon. The bottom has some linen thread double tied. The sentiment is from SU "Much Appreciated." Oh, and I paper pierced the edge of the caramel layer for interest. I think it turned out pretty good for a masculine card. Happy Boss' Day. Don't forget to thank your boss for a job well done.

Oh, and in other news, Mr Brown (aka UPS) will be coming today to drop off a bunch of paper, some stamps and oval punches. YAY! I am pretty excited because I need to cut and prepare for Super Saturday which is only a few days away . . . YIPES!

Comments

Jody Morrow said…
Awesome card Manda! Very masculine!
Jen said…
Great card Manda!! I struggle with masculine cards too--and you've nailed it!
Anonymous said…
It's Mucho Masculine!! The pierced layer really does add some great interest,. it is the first thing that caught my eye! You really know how to make your piercings in ust the right place to really complete a card!
Cyndi said…
Awesome Card Amanda! I love all the layers! NICE!

Popular posts from this blog

My Decade Later Comeback and Playing Catch Up

Hello friends, It's been awhile and I kind of dropped off the face of the planet since moving to Oregon. I got busy with growing four babies into teens, and attempting to hold together a marriage with a partner who was working out of town for the most part. It was a lot! Truth be told, I have been spending most of my time over on Instagram which allows for more quick picture and caption posts (@the.amanda.sewell), but I really, genuinely miss having a journal of our adventures, so I'm back.  Some changes, my ex-partner moved out in October of 2023 (after 23 years of marriage, who would have thought?) and I am on a new, single mom adventure with the fabulous four. Luckily, they are adjusting to the changes well as we navigate this challenging time as a family team. Things are still in flux and hopefully at the end of all of this, the dust will settle and we will end up landing on our feet. Because of this change, I needed to go back to work and after not working for the past lo...

ALMOST TO 50K

EDITED TO ADD: I go by my first name, not my middle. My first name is Amanda. *smiles* Also, I am going to keep this post bumped up to the top so people can find it, but I will be posting more, so please take a moment to scroll down to find the latest stuff -- this will stay up until 50K is reached. *************************** I am so amazed that so many people have been interested in little old stamping me. Okay, well, not me actually, probably mostly my work, but either way, I'm SUPER FLATTERED! I appreciate all the comments you leave me. They really do validate me and make me feel like I should keep on going with this blog. You all ROCK! So, I have decided to do a small giveaway to show my appreciation to you. I will have two separate contests. Both of these contests will win you blog candy (yummy embellishments, and other such fun stuff). The first one is to guess my middle name. You can post your guess as a comment to this post and then I will do a drawing of every...

It's HERE!!!!!!! Tutorial for Pinecone Balls

UPDATED: For all of you interested in winning a kit to make these balls -- go HERE by December 1st, 2007 to enter to win!!!!! HAPPY BLACK FRIDAY -- So you missed the greatest deal ever because you were too far back in line -- never fear, I am here to help your day get better!!! Okay, due to the overwhelming demand for directions, I decided to do this a little earlier than I planned because SERIOUSLY you guys are all overloading my email box. I really hope you "get" them and that at the end of this tutorial you all will be happily playing with your pretty christmas ball. Bear with me, this will be my first time ever doing this . . . INGREDIENTS: 1 sheet of 12x12 paper (or a couple if you like) 1 three inch foam ball (white foam kind) 1 package of pins (I use Applique pins - 19mm - you can get these at walmart) 1 length of ribbon (I prefer wide SU organdy) 1 thimble 1 paper cutter STEP 1 Choose your paper(Mine is by K&I Memories). Small prints or loud paper work best ...